
Online blogging has been making a lot of money for many people around the globe. How is it possible that so many people from all walks of life and all ages are creating blogs and making an above-average living from just having an online blog? Cannabis blog ideas are abundant, and this low-hanging fruit is ripe for the picking in 2024.
Is there something supernatural about throwing blobs of text on a page and adding a few images? And, honestly, how many people want to read the scattered thoughts of an average person like you or me?
The cannabis blog you are reading now gets quite a few unique visitors a month and generates decent revenue for many guys who love what we do. I promise we are far from professional writers or college grads.
If you already have an established cannabis blog. You may want to use the best cannabis affiliate links once your marijuana blog gains a little traction to earn a passive income.
How to Start a Cannabis Blog
Making money with a marijuana blog does not happen overnight, especially if you’re starting with a brand-new blog. However, if you follow the plan we’ve laid out for you, you will make a passive income soon.
The following information will show you every step necessary to create an excellent, clean, functional blog. I will also show you how to grow it AND learn how to monetize it in less than a couple of hours.
Let’s start by reviewing how to become a blogger and get your first online cannabis blog up and running.
This is so exciting!
Step 1. What’s Your Big Idea?
If you want to create a blog, you don’t need a brand-new idea. But your blog should be focused on something specific, such as marijuana, supply, growing, seeds, etc.
Remember that no idea, no matter how good, is truly unique.
You do have a distinct voice, character, and unique experiences. Your vibrant personality will probably attract others, such as your family, friends, and people who believe precisely how you do.
You need to ask yourself two questions when choosing your blog’s niche.
1) Am I Interested in this Topic?
Your readers will know if you don’t love what you’re blogging about. You will also get burned out on the topic quickly, and all your work will be for nothing. I’ll say, “You shouldn’t even start blogging about a subject if you don’t love what it’s all about.
Whatever subject you decide to write about, you need to love it and want to learn everything you can about it. If you don’t, you’ll run out of topics and ideas to write about. By loving a topic, you’ll be able to consistently create content and write about things that help build and keep your audience coming back for more.
If you’re still lost, consider what you already know about. Is growing marijuana your forte? Do you like to consume marijuana in different ways? Unbiased independent review blogs get a lot of attention over time.
2. Are There Others Interested in the Same Things?
Don’t think you’re the only mid-20-year-old out there who’s obsessed with marijuana. I promise you there are others.
You can find out by doing a quick Google search for “people who smoke marijuana,” and you’ll find 48,900,000 results directed at people like you.

Google search results for topics on people who smoke marijuana.
If you think your idea is too odd. Or, maybe too broad? Don’t be surprised when you see millions of results for your search topic.
If you are interested in cannabis and want to start a marijuana blog, avoid using only broad words like marijuana, cannabis, weed, etc. Be specific, like “consuming marijuana” or “medical marijuana benefits.”
You will want to find your niche and grow your blog to succeed.
Step 2. Choose a Name for Your Cannabis Blog
This is where it starts to get fun and exciting. It’s also crucial because your blog name will also be your brand. This is how you’ll be remembered. However, you don’t want to overthink your name. Many new bloggers get stuck on this. The secret is to take action immediately and gain traction.
A domain name is what is typed in the URL bar at the top of your browser and will also be your blog’s name. For example, the blog you’re reading right now is marijuanaaffiliatemoney.com. A domain name will cost you around $11 a year.
Don’t sweat it if you don’t find the perfect domain name; you can still start your blog and change its name later.
Brainstorming is the best technique for finding the perfect name. In the last phase, we discussed letting go of your thoughts and identifying your specialty. Now, it’s time to give those concepts a name.
So, start with some paper and a pen. Write down every phrase related to your topic that comes to mind for a few minutes.
Start putting words and phrases together after that until you find something that sticks out. Write down somewhere between five and ten names that you think would work.
Please check whether those names are accessible as domains right now. Your blog is housed on a domain on the internet.
We suggest not using your name for your blog, but it’s not a deal killer. If you use your name, it may be harder to sell if you decide to sell your blog for a profit in the future.
If none of your top picks for site names are available as a .com, start over and develop other ideas.
Tips for naming your cannabis blog
Take these tips into consideration when naming your cannabis blog.
- Use a .com extension over others. They’re easier to remember.
- Avoid using hyphens or numbers. They are difficult to remember, and people forget hyphens.
- Go for something memorable or catchy.
- Try to use keywords that represent what your blog is all about. Keywords will help people quickly identify your blog’s niche and help search engines distinguish what you are writing about.
- Aim for two to three words. Most, if not all, single-word domains are taken.
- Try to stay under 15 characters. This cannot be easy, but it may happen. This blog URL is 23 characters long.
- For personal brands, use your given name or a variation of it.
Finding the perfect name may take a little time and effort, but starting your brand-new blog will be well worth it.
Step 2. Get Web Hosting for Your Cannabis Blog
Web hosting is a paid service that allows your cannabis blog to be accessed worldwide through the internet.
Web hosting and a domain name are two essentials for a successful blog. Without web hosting, your blog will not be found online, and without a domain name, it will not have an address.
When it comes to hosting companies, there are many to choose from. Prices range from $3 to $50/month for the new blogger just starting.
If you’re starting a new blog, you should use HostGator. They are one of the largest hosting companies available and are very well-known in the industry.
Since you’re just starting, you don’t need any additional bells and whistles. Once you gain momentum and get over 25,000 visitors monthly, you can decide whether to upgrade. Don’t worry; HostGator can scale with you.
Step 3. Install WordPress – Your Blogging Software
Now that you’ve found your niche and name, you must find some blogging software before starting your blog. I have all my blogs on WordPress because it’s user-friendly, powerful, and accessible.
There are many other blogging software platforms to choose from. However, if you create a blog that is not on WordPress, you will find it can be costly and fast.
WordPress offers thousands of free plugins that will help you add value and modify your blog pages and layout in any imaginable way. Many free WordPress plugins are just a couple of clicks and are up on your blog.
You don’t need any technical nerd experience whatsoever. You can install WordPress with exactly five clicks of the mouse.
Here’s precisely how to do it.
Once you’ve set up your hosting account and domain with HostGator, log in to the cpanel, find the website section, and click on the icon “Install WordPress.”
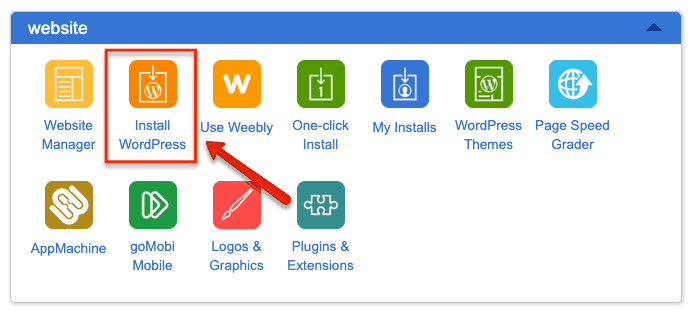
How to install WordPress on your cannabis blog.
You don’t have to pay to have your theme professionally installed. We’ll show you how to do it yourself.

Select the domain name to install WordPress.
Hit the arrow to select your domain, and we’ll leave the same directory. Once done, hit the “next” button.
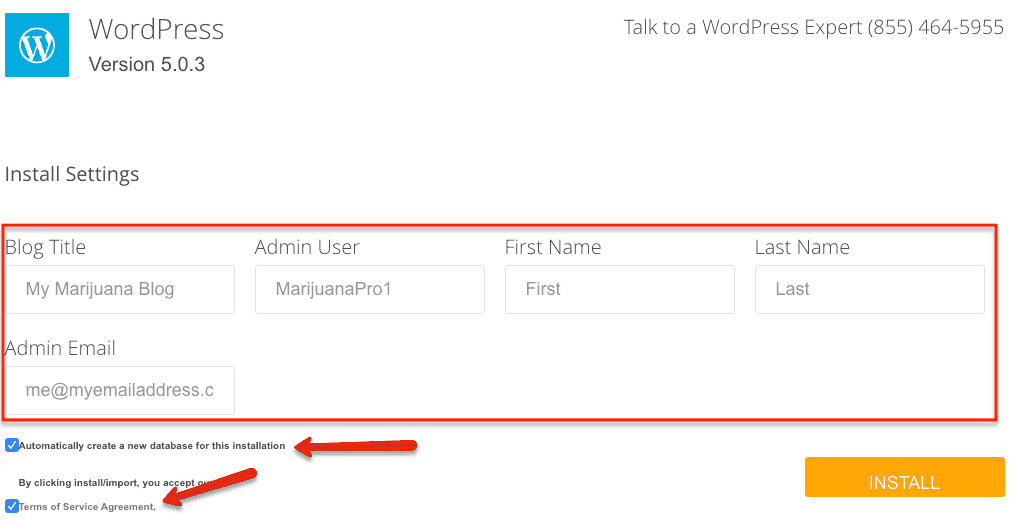
Add some basic information into the WordPress installation settings.
You will now add a little bit of detail to your cannabis blog. Add your blog title, and make your admin username unique and different. You can also add your first and last name and whatever you want to use for an email address.
Please check the two boxes at the bottom before you hit the “install” button. Within a few minutes, you will have a fully functional WordPress cannabis blog ready.
Step 4. Add a Design to Your WordPress Blog
WordPress designs are called themes in the blogging industry. The foundation of your cannabis blog will be pretty basic and look something like this:
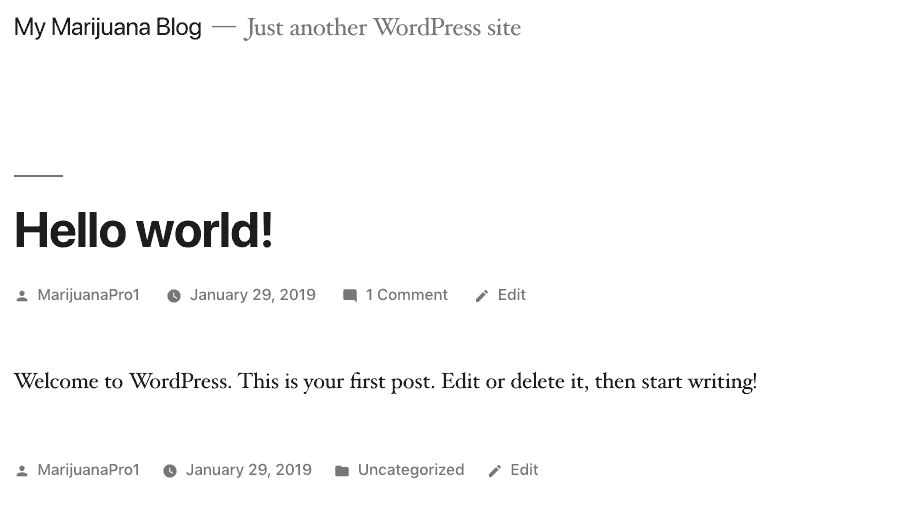
This is a screenshot of the essential WordPress blogging layout.
It’s not the best-looking design, but it’s a great foundation.
There are thousands of themes to choose from, some free, some paid, and some even have trial memberships. It can be straightforward to get wrapped up in all the glitz and glamor and not get anything done.
The good thing about themes is that you can change them at any time, so we’re trying to say don’t get hung up on picking a theme. The goal is to find something decent and begin blogging.
We’re going to show you how to find all these themes now. First, you will need to log into your WordPress admin section. You do this by going to yourdomain.com/wp-admin.
Now, you will need to enter your admin name and WordPress password.
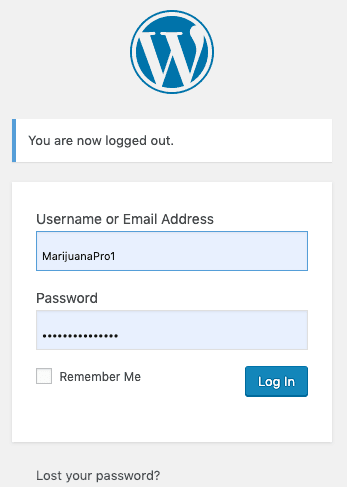
The WordPress login page.
Don’t let it scare you if you’ve never seen the WordPress dashboard. It’s new; before you know it, you will be an expert at navigating it.
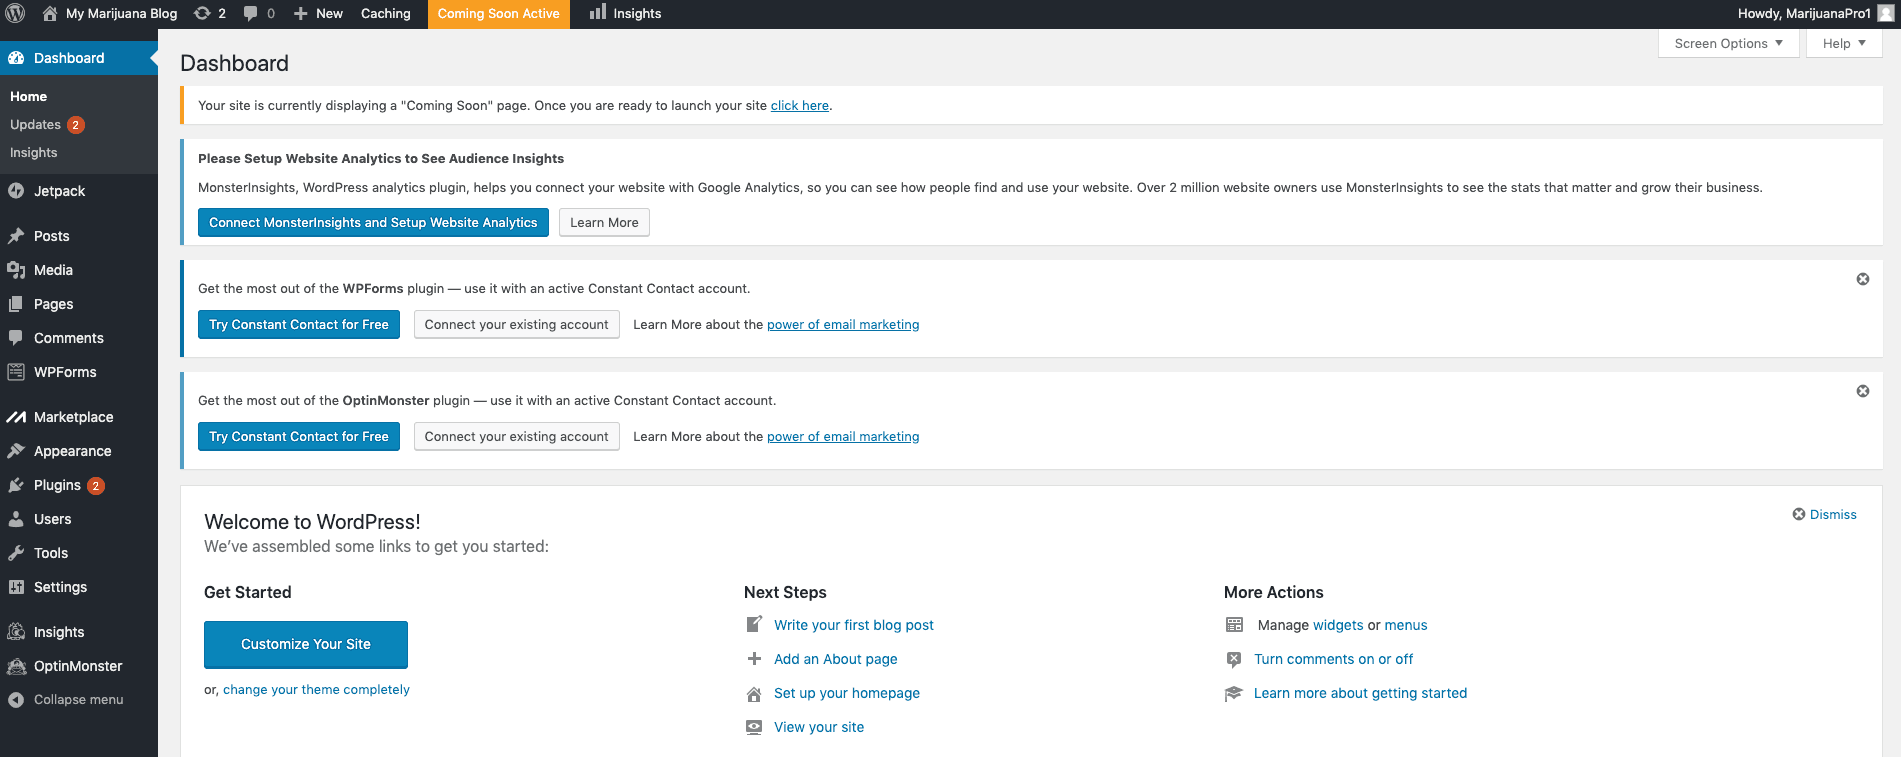
The WordPress dashboard.
Now, we’ll show you how to add a new theme to your blog and add a little flavor.
To install a theme, hover over the “Appearance” menu in the left sidebar and click “Themes” when it comes up.
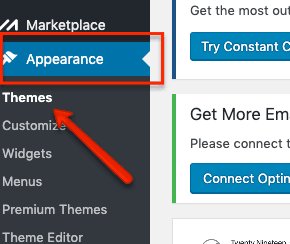
WordPress theme appearance tab.
You will see a few standard themes already installed: WordPress’s “Twenty-[various-year]” themes.
We will show you how to search for better, more modern themes that instantly make people want to stay on your cannabis blog for a while.
Click the “WordPress Themes” at the top of the page to access many excellent themes.

How to select a theme for your cannabis blog.
Since we all have different likes, WordPress has added a “Feature Filter” so you can narrow down your search for something that fits your style. Remember, you can change your mind and theme later if needed.

Feature filter on WordPress.
The three categories in the Feature Filter are “subject, “features,” and “layout.”
We like to select “blog,” “custom header,” and “grid layout.” However, you can choose whatever best suits your needs.
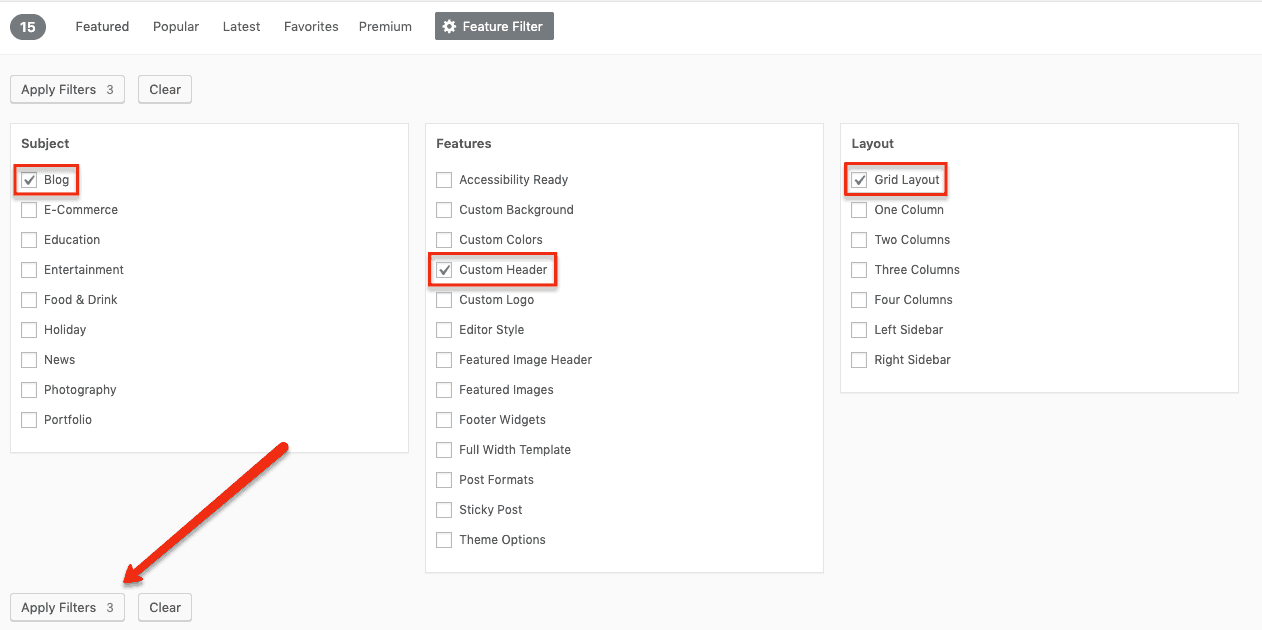
How to apply filters when searching for the perfect WordPress theme.
Once you’ve selected your filters, hit the “apply filters” button, and you’ll instantly see beautiful themes that would cost you thousands of dollars if you had a web designer create them.

Select a free WordPress theme template for your cannabis blog.
If you find a theme you like, you can click on its thumbnail to get an instant preview of what your blog will look like.
Take a minute to evaluate whether the theme fits both the topic you’re covering and your st e. (Keep in mind that you can customize colors, pictures, fonts, etc., within the theme itself at a later time.)
Once you’ve settled on a theme, click the “Install” button to launch your new theme.
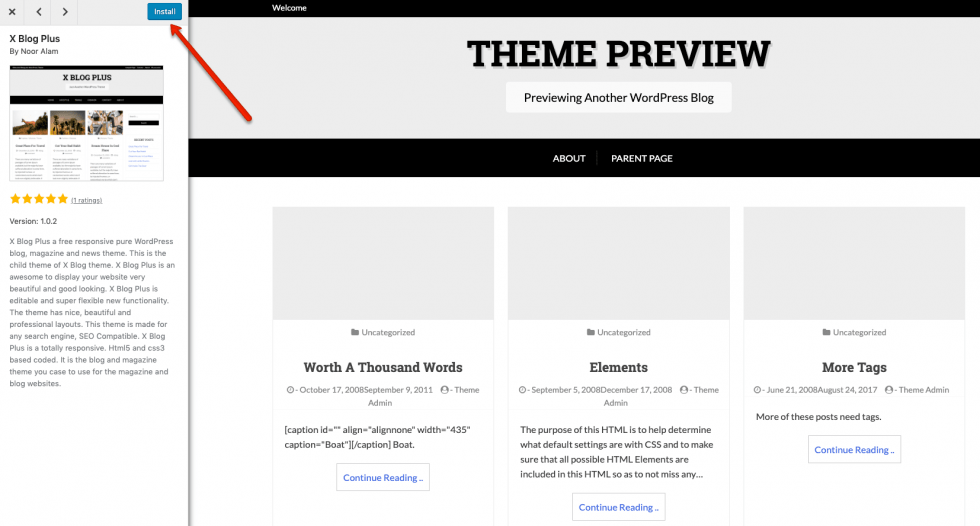
Install the theme template you want to use on your cannabis blog.
When your new theme is finished installing, press the “Activate” button, and you’re ready to go.
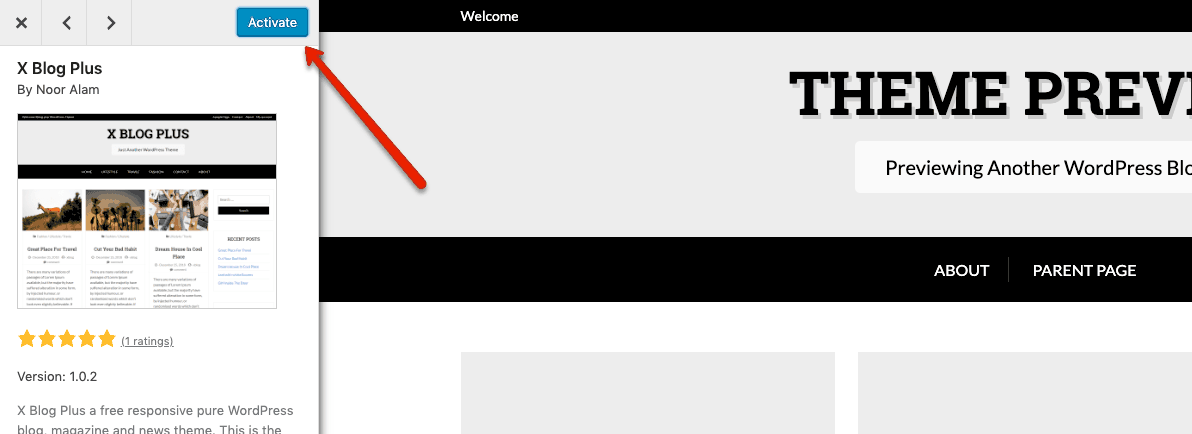
Activate your new cannabis blog theme.
If by chance you can’t find one that fits your personality, there are premium themes you can purchase for a price. Read the terms and conditions; some themes are one price, and others may charge annually.
If you can’t find a theme that you like, there are premium themes that you can purchase from sites like:
- Elegant Themes (This website is built with an Elegant Themes template)
- Themeforest
- Thrive Themes
- StudioPress
Now that your theme is activated let’s start customizing your cannabis blog.
Step 5. Customize and Optimize Your Cannabis Blog
There are thousands of customizations you can make to a WordPress blog. For the sake of this tutorial, we will stick to the basics.
The theme is the foundation of your design. It includes the core features to run your blog. WordPress has all kinds of scripts called plugins. These free and paid plugins can help extend or add to the functionality of your blog.
There is a plugin for everything you would like to do on your blog. Some plugins add sliders, forums, or contact forms. However, some themes don’t always have some of these features available as essential features.
To customize your active theme, the first step is to click the “Customize” button.
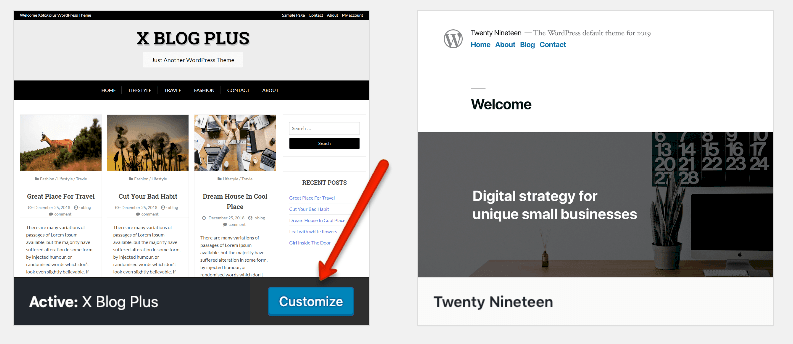
How to customize your cannabis blog theme.
The left-side menu options may vary depending on which WordPress theme you choose. The primary item you’re looking for is the “Site Identity” tab.
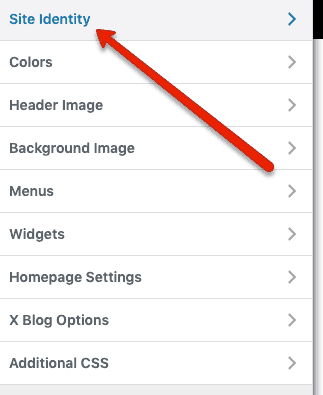
Create a site identity for your cannabis blog.
Next, you will want to add your site title (name of your blog) and, if you wish, a short, catchy tagline. Once you’ve filled it in, click the “Save and Publish” button.
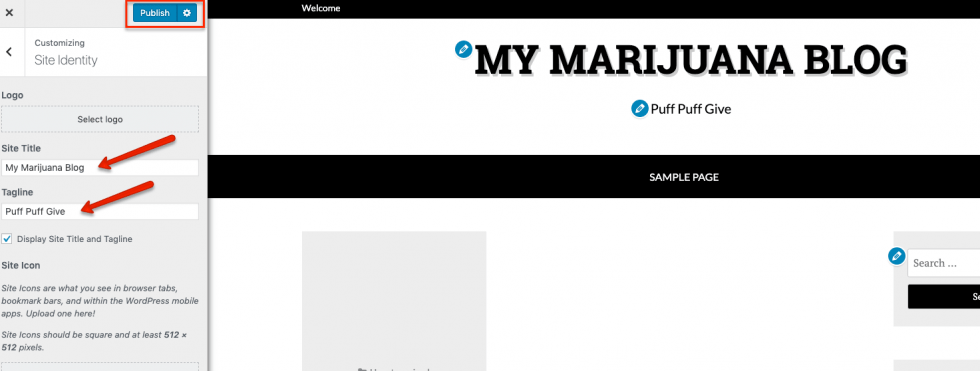
Enter the site title and tagline of your cannabis blog.
Next, you will want to add your site title (name of your blog) and, if you wish, a short, catchy tagline. Once you’ve filled it in, click the “Save and Publish” button.
Optimize Your Cannabis Blog for Search Engine Traffic
Search engine optimization (SEO) is a multi-billion dollar industry. It has made ordinary people millionaires overnight.
SEO is the term for optimizing your website so it can be found by search engines such as Google, Bing, and Yahoo for specific keywords and phrases.
Marijuana, cannabis supply, and everything associated with it are becoming more mainstream as more states and countries legalize it.
This means learning how to capitalize with a search engine-optimized cannabis blog puts you in the right place at the right time.
We owe much of our online success to learning and keeping up with SEO. It has helped an ordinary group of people live a lifestyle where they do not need to answer to anybody and can do what they want.
If you have never heard the term SEO or this is your first time hearing it, don’t be afraid. WordPress makes it simple to optimize the technical aspects of your cannabis blog.
When it comes to SEO, you should focus on creating unique, engaging content for real people like you. You can do this through text, images, or even videos. Your main job is to cultivate a relationship with your readers.
The best way to do this is through informative and relatable friendly conversation.
The first thing you can do is download a plugin named Yoast SEO.
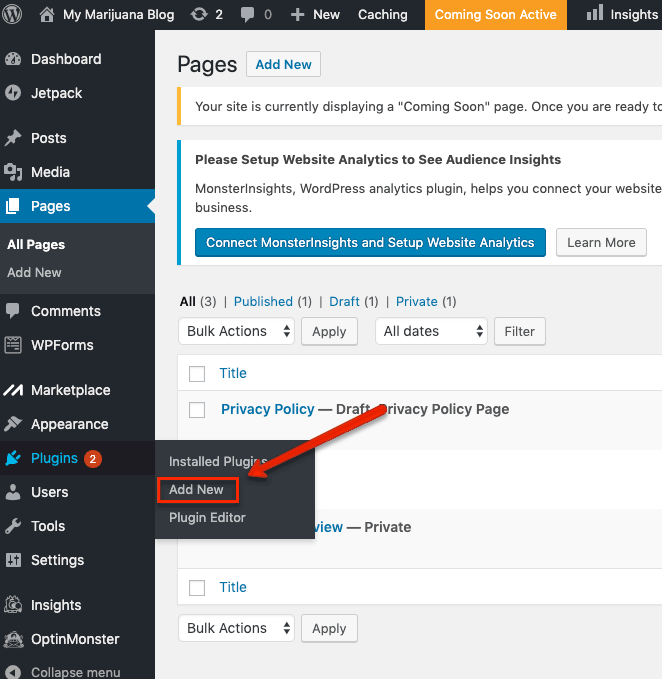
How to add a new WordPress plugin to your blog.
In the search bar, type “Yoast SEO,” and the first one should be correct.
You will click “Install Now” and “Activate” once available.

How to add the Yoast SEO plugin to your cannabis blog.
You will now need to access the Yoast SEO plugin’s settings. You can do this from the icon at the top of the page or the SEO menu from the left sidebar.
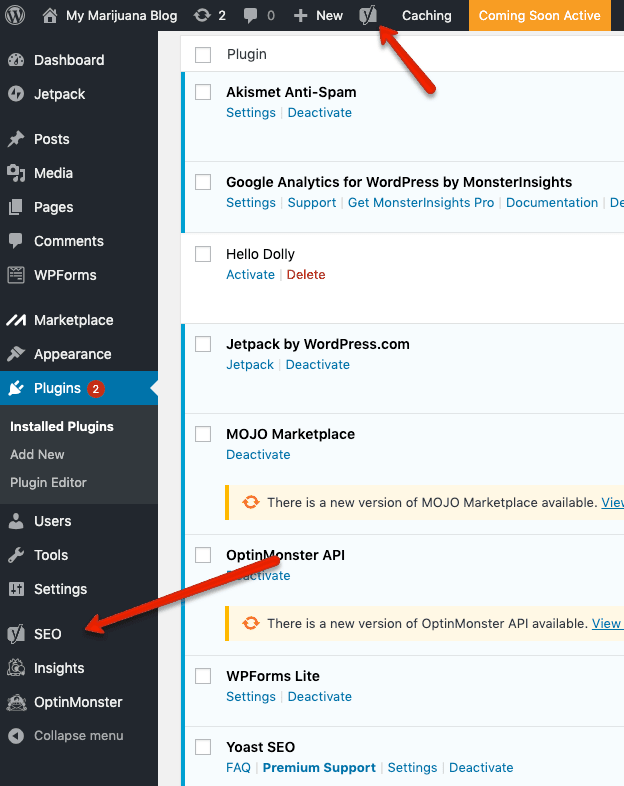
How to access the Yoast SEO plugin.
Once in the Yoast dashboard, click on the “configuration wizard link” to set the essential foundation for your blog.

How to configure the Yoast SEO plugin.
The Yoast SEO plugin will take you through 8 steps. These fundamental questions will help optimize your cannabis blog.
Step one asks you to select the environment that best fits your website. You will likely want to choose “Option A” if you intend to start driving traffic to it immediately.
You may choose “Option B” to finish your site before launching it. If you choose option B, don’t forget to change the setting when you publish your blog.
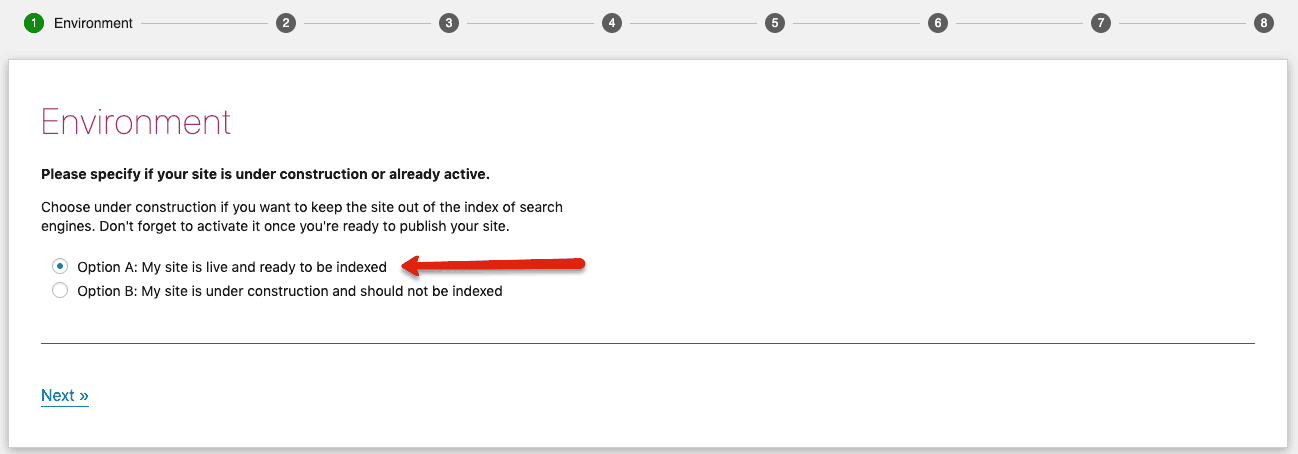
Select your Yoast SEO environment.
The next step is selecting the type of site. Since we are building a blog, select it and click “Next.”
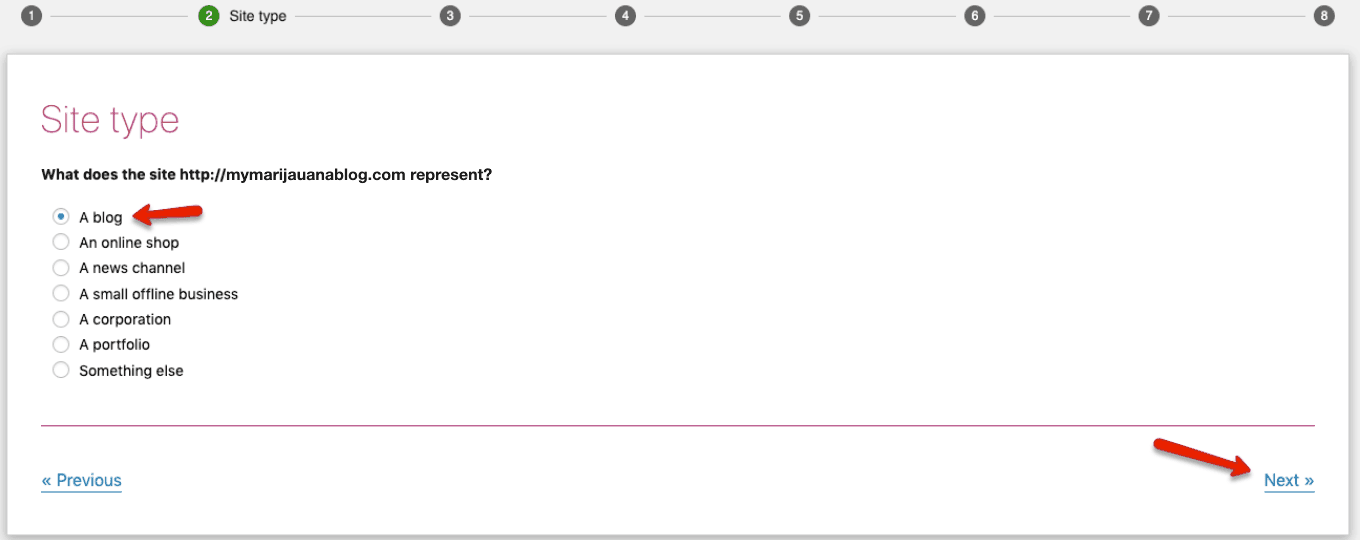
Select your site type.
Yoast asks if you are setting up your blog as a company or a person; choose one and click next.

Select if your cannabis blog represents a person or organization.
Step 4 concerns search engine visibility. You will see that the default settings for “Posts” and “Pages” are set to “Yes.” So you’re good to go; click next.
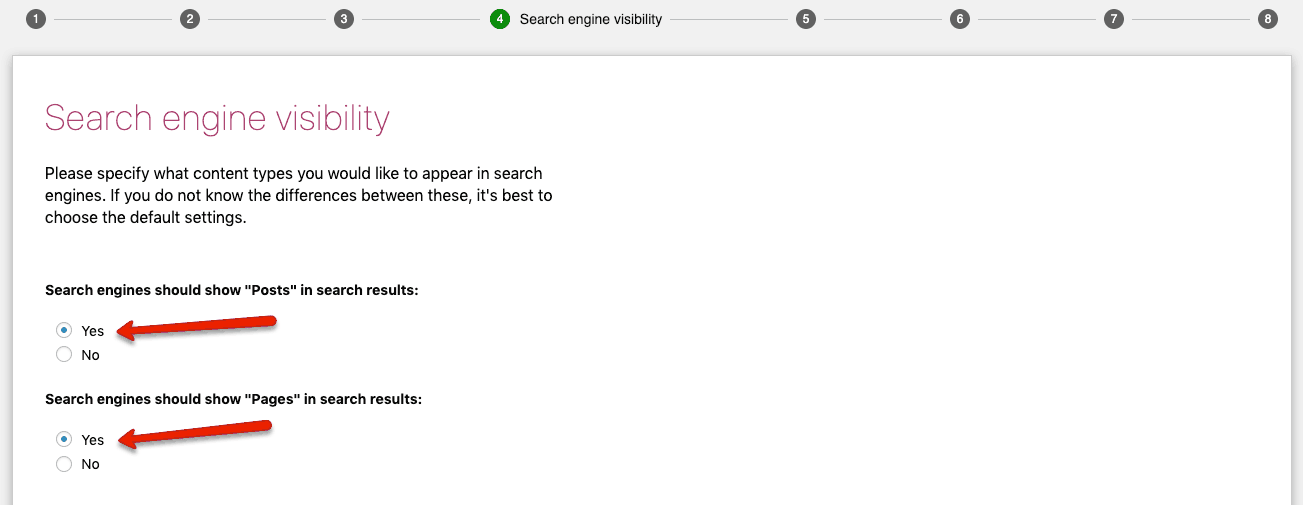
Specify what content types you would like to appear in search results.
Now, you must decide if you will only be blogging or have several bloggers. No need to worry; if you choose to add another writer in the future, you can change this setting later. Once finished, go ahead and click next.

Select if your cannabis blog will have multiple authors.
Section six allows you to choose a title separator and verify your blog’s name.
You don’t have to put a lot of thought into this; it has no bearing on your search engine optimization. A title separator is a symbol that separates your blog title and website’s name in the meta title information within search engines. This is what people see when searching for something in a search query.
You may see an example in “How to Start a Cannabis Blog that Makes Money—The Marijuana Consumer.”
You must select the one you want to use and click the “Next” button when ready.
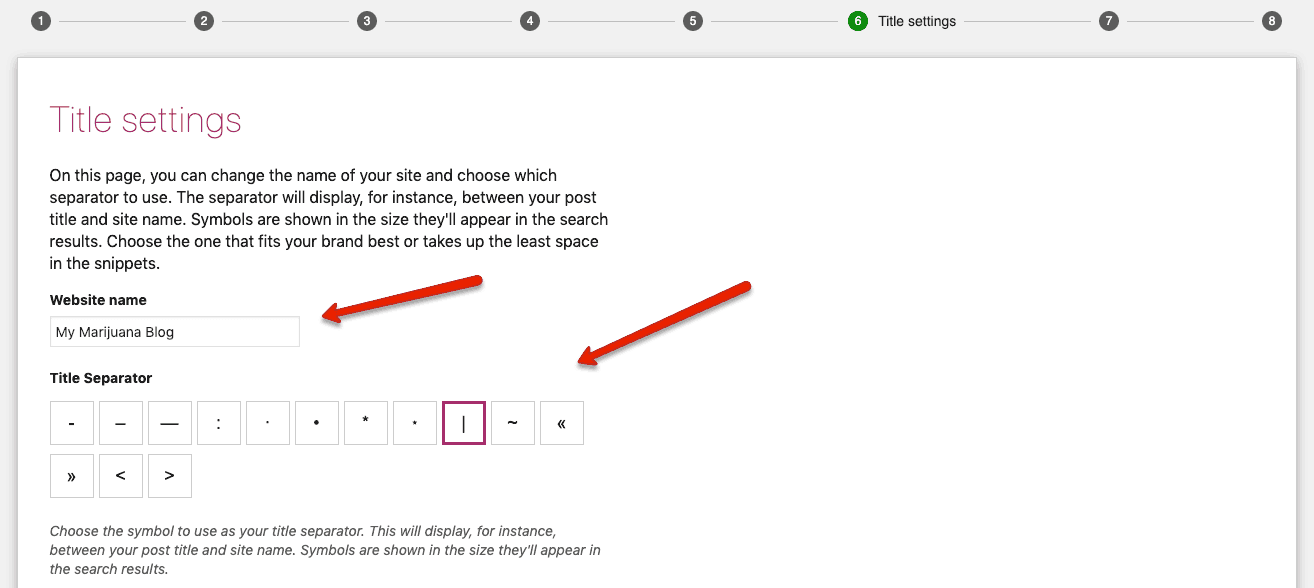
How to add title settings for your cannabis blog.
The following section is Yoast asking if you would like to subscribe to their newsletter and some other information. It is up to you if you would like to receive news, information, and tips about search engine optimization. We would highly recommend it for beginners.
If you want to subscribe, add your email address and click the “Sign Up” button.
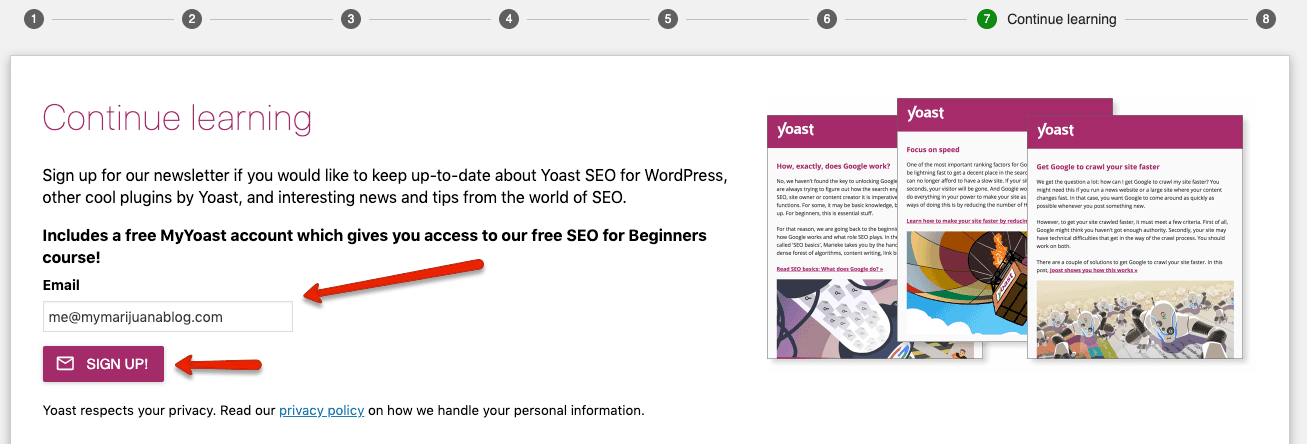
You can sign up for the Yoast SEO newsletter for continued learning.
The last step is just a “Success” page, so that we will skip it for this tutorial.
We will go to Google Search Console, formerly known as Webmaster Tools. This tool allows you to submit your site to Google’s search index and helps optimize its visibility to searchers.
Click on the SEO section on the left-hand sidebar and then click on the “Webmaster Tools” tab.
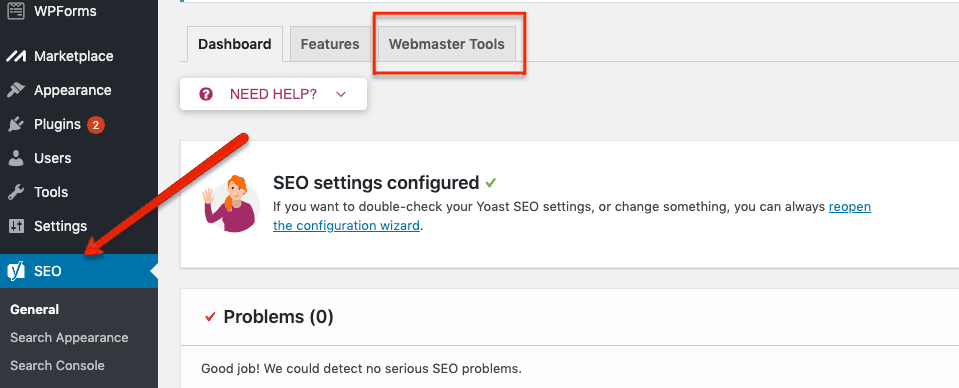
Where to find Search Console in the Yoast SEO dashboard.
Now click on the blue “Google Search Console” link. This is currently the most important one to set up. You can return later and set up any other webmaster tools.
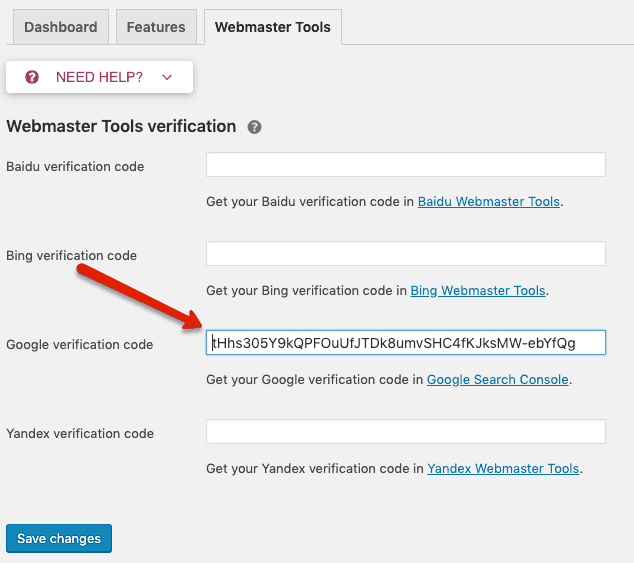
How to set up your Google verification code for your cannabis blog.
If you are not currently signed in, you will need to log into Google with your username and password. If you don’t have one, click “Create account” and create one.
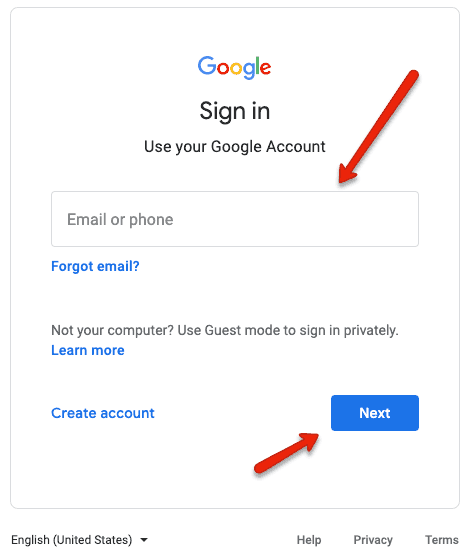
Enter your Google account information to log in.
Once logged into Google, press the “Alternate Methods” tab and select the “HTML tag” to verify your cannabis blog.
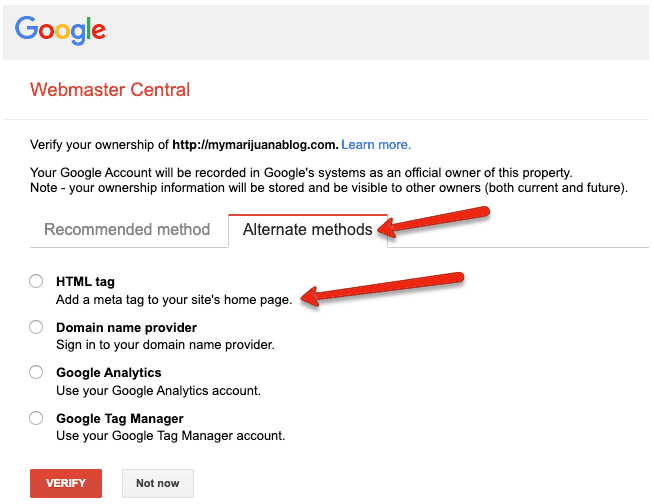
Click alternative methods and then select HTML tag.
A new screen will appear that contains your search console metacode. You will want to copy the alphanumeric string without quotation marks. (Do not close this window after copying the code)

Click alternative methods and then select HTML tag.
You will take your copied meta code and paste it into the Google Search Console text box and then hit “Save Changes.”

Paste the copied code into Webmaster Tools.
Now, you will want to go back to your Google Search Console screen and click the “Verify” button. (If your site doesn’t verify, double-check your work and make sure you do not have a “Coming Soon” page turned on in your blog.)
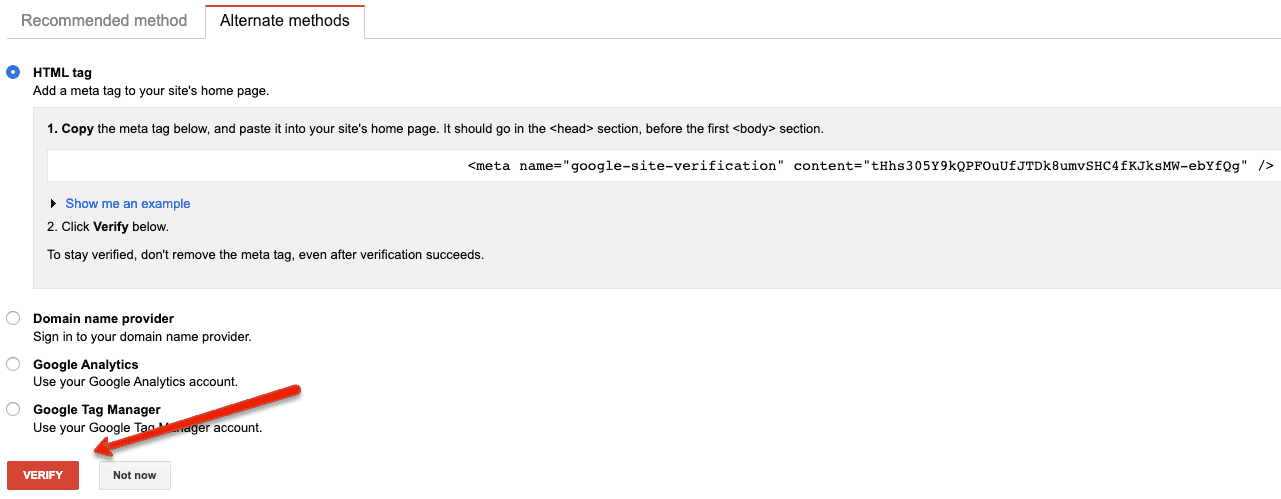
Verify your cannabis blog through Google Search Console.
As you browse the Search Engine Console, you will start to understand and gain a wealth of knowledge about keyword phrases used to find your blog, errors on your site, and just a lot of data-driven information.
You also will find the ability to give Google a little nudge when you publish new posts.
About XML Sitemaps
The last setting we’ll set up in the Yoast SEO plugin is an XML sitemap. XML sitemaps are files that list all the URLs for your website.
An XML sitemap helps search engines like Google crawl your site for any newly published posts or pages. The Yoast SEO plugin has a built-in feature that automatically updates your sitemap, so you can set it and forget it.
To access this feature, click the “Features” tab and make sure all the components are set to “On.” Don’t forget to hit “Save Changes.”
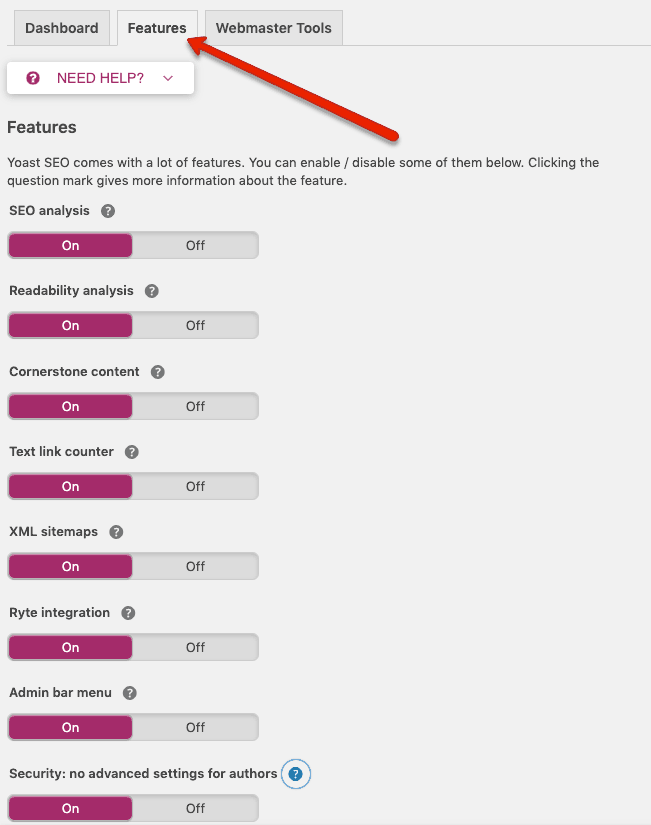
Make sure all sliders are on in the Yoast SEO features section.
You can adjust these to your personal preferences. We’ve just set them up to this point to get you up and running with the best possible outcome.
Setting Up Permalinks for Your Cannabis Blog:
Permalinks will help you with your SEO journey. They are static hyperlinks that lead to a particular page or blog post. WordPress sets your permalinks to a post ID by default that looks like this – yourdomanin.com/postID.
Example of a default WordPress Permalink.
As you can see, this is not very good-looking and doesn’t help or tell anyone what is on the page before clicking.
I will show you a simple fix that will help with the permalink structure and your SEO efforts.
Go back into the left sidebar, hover over “Settings,” and click “Permalinks.”

Change your marijuana blog permalink settings to post name.
There are several options. I highly recommend using the “Post Name” option to capitalize on keywords in your post and page URLs. Make sure you hit save after you’ve chosen your setting.
If you’re still here, we congratulate you on a well-done job. You’ve purchased your domain name, set up web hosting, installed a custom theme, and optimized your cannabis blog to be found and crawled by search engines.
Take a moment and pat yourself on the back!
Step 6. Cannabis Blog Topics Needed
Your blog is already set up and ready to go on the technical side. All you have to do is develop exciting topics to add to your masterpiece.
Most of your blog posts will come from personal experiences, successes, failures, and newly researched learnings.
Most professional bloggers use search engines to ask questions such as:
- Should I start a blog?
- What should I blog about?
- What to write about?
This is where you should start with some questions and write them down for future blog ideas. When we have a new blog idea for our marijuana site and are looking for inspiration, we use a list of questions and a brainstorming system to develop fresh content.
It may sound daunting, but it is far from complicated and will not take much time.
If you follow the tips below, you can come up with around fifty topics you can work on within about 30 minutes. (distraction-free, of course)
Grab a pen and paper or open a document on your computer to take notes.
Your goal for this system is to get about ten answers for each of the following questions. Keep in mind that 10 is the goal. If you can think of more, write them down; if you can’t think of ten, do your best.
This exercise will help you find topics for any blog, not just a cannabis blog.
You will want to put yourself in your reader’s mind and start with these five questions.
1. “What do my readers get excited or passionate about, and what intrigues them?”
Example answers:
- As a marijuana smoker, I get excited about smoking good weed.
- I’m passionate about the different ways of consuming cannabis.
- I’m intrigued by the growth process of the marijuana plant.
2. “What character traits do my readers have?”
Examples:
- Marijuana smokers are laid back.
- Cannabis users can be very creative.
- People who smoke marijuana tend to like the taste of food.
3. “What are some significant obstacles my readers endure?”
Examples:
- Cannabis is not legal in their location.
- The bad stigma of being a marijuana smoker.
- Finding sources where they can purchase cannabis.
4. “What do my readers love about the cannabis niche?”
Examples:
- Marijuana users love to try new ways to consume cannabis.
- Cannabis consumers love to learn about new strains.
- Smokers prefer consuming marijuana over booze.
5. “What do my readers hate about the cannabis niche?”
Examples:
- Being labeled a “lazy stoner” for being a cannabis consumer.
- Marijuana is not recreationally legal in all locations.
- There is a lot of misleading information on the subject.
I think you understand what you’re trying to do. This will work with any niche, not just for a cannabis blog. Once you get to around 50 answers, you can begin working on blog post ideas from each of the above. You can most likely see now that you’ve created an unlimited resource of blog post ideas.
Here are a few examples of cannabis blog topics from the above list:
- Marijuana Grow Boxes and Why You Should Buy One
- The Best Cannabis Strains When You Want to Relax
- Where is Marijuana Legal?
- The Marijuana Bong and How it Works
- Vape vs. Joint: Which is More Enjoyable?
- How to Roll a Joint the Right Way
- Smoking Weed: My Favorite Way to Consume Marijuana
You aim to develop a catchy headline to draw readers in and then hit them with a right-left in the rest of your cannabis blog content.
Step 7. Write Your First Cannabis Blog Post
This is when WordPress becomes very useful. WordPress has an intuitive editor built in, similar to common word processing tools. New blog entries will be created directly from your WordPress admin.
First, you will want to click on “Posts” on the left sidebar.
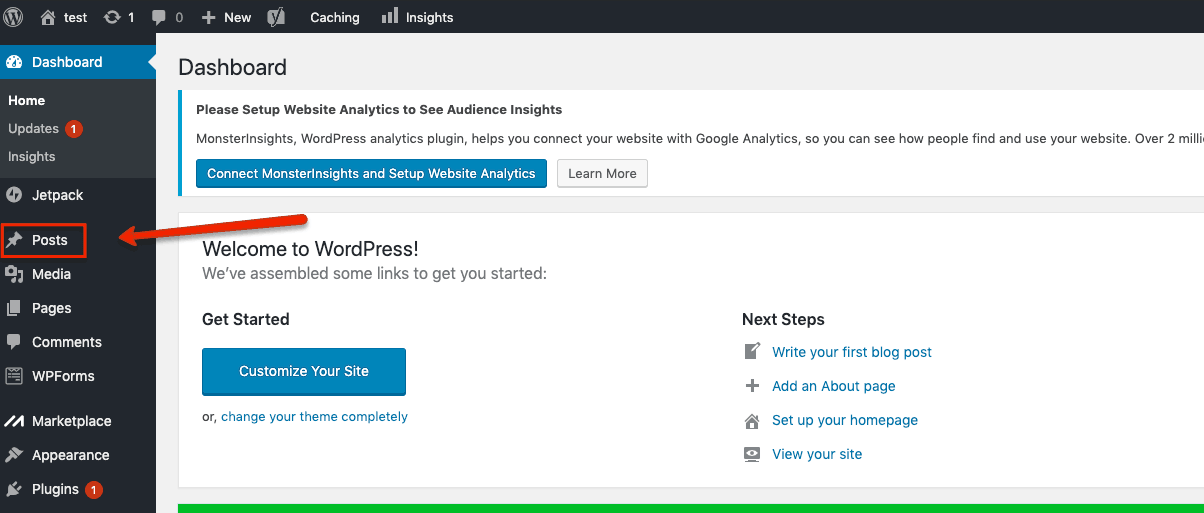
To create your first cannabis blog post, click “Posts” on the left sidebar.
This will bring up all your previous blog posts in descending order. Since this is your first blog post, you may see a “Sample Post” or nothing.
To begin your first marijuana post, click the “Add New” button at the top of the page or in the left sidebar.
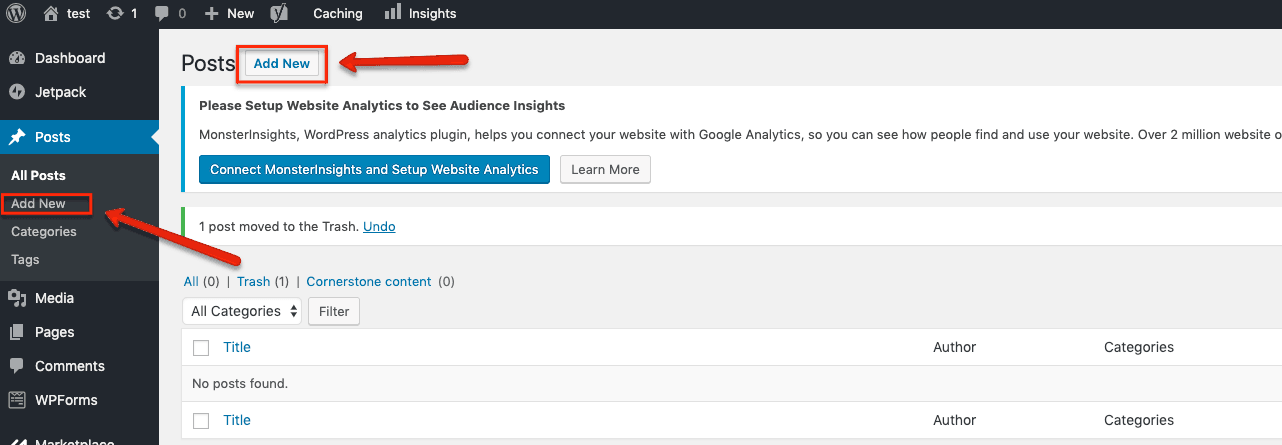
Click “Add New” to begin a new cannabis blog post.
Now, you are introduced to the WordPress editor.
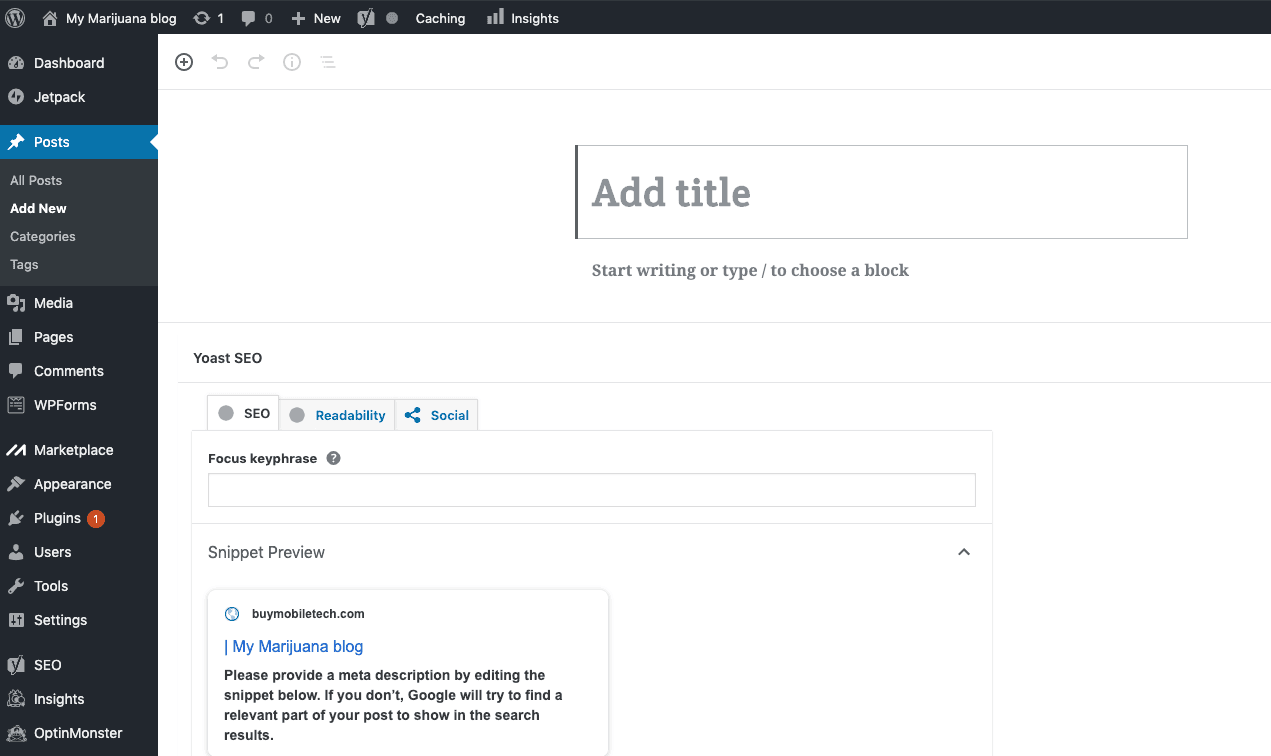
Introduction to the WordPress editor.
The first thing you want to do is add a headline or title to your cannabis blog. You will want to refer back to the exercise you did previously. Once you type it in, WordPress will automatically create a permalink based on the keywords you used in your headline.
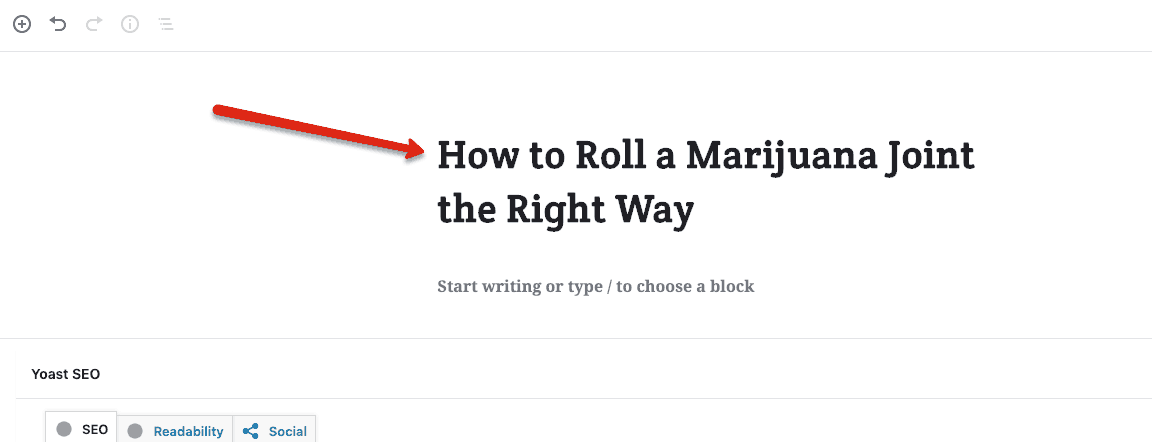
Add a headline to your cannabis blog.
Once you click on the box to start typing, you will see the WordPress additional toolbar open at the top of the screen. You can use these tools to add different designs to your posts. These tools are handy when creating additional subheadings throughout your posts.

The WordPress additional toolbar is helpful for editing.
Continue to add additional content to your posts until you are satisfied with the outcome.

Add content to your cannabis blog.
An image is worth a thousand words; you should add a few to your articles. Images help engage readers and can often convey your point better than words. Lovely, clear pictures will help keep readers interested and hanging around on your blog.
To add a new image, first click on the area where you want to put the idea. Hover over your text, and a blue + sign will appear. Click on it, and a pop-up will appear; you can see all available options. Select the “image” icon.
NOTE: You can also hover over a section of the text, and an up/down/move icon will show up on the left-hand side of the section. This will allow you to move that specific section to a different area within your blog.
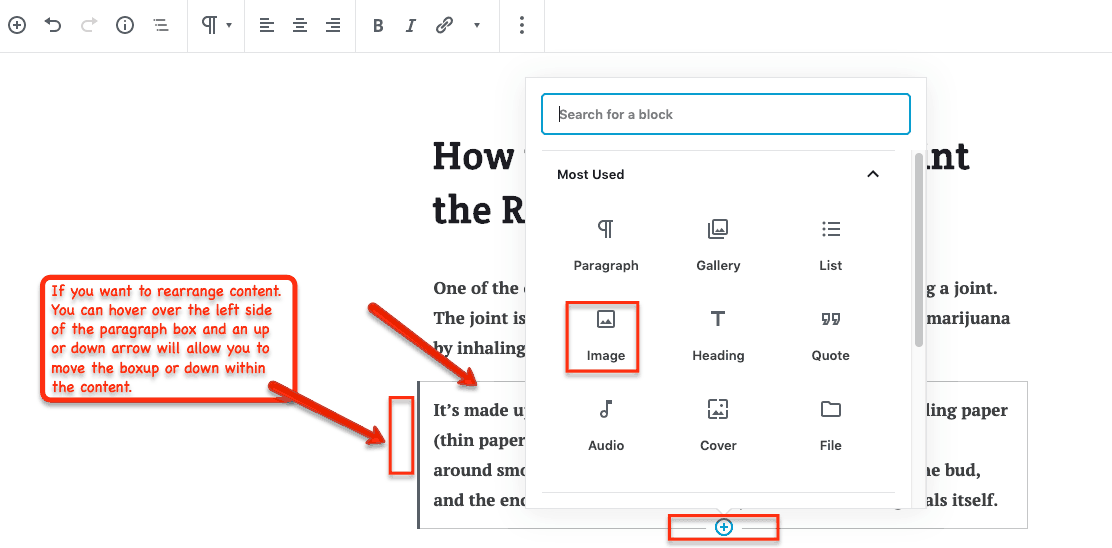
How to add an image to your blog page.
Select the image you want to use and click “Select.” If you don’t have photos, click the “Upload Files” link to add some from your computer.
There are many options on the right sidebar of the media library. You can play with those settings later to get familiar with them.
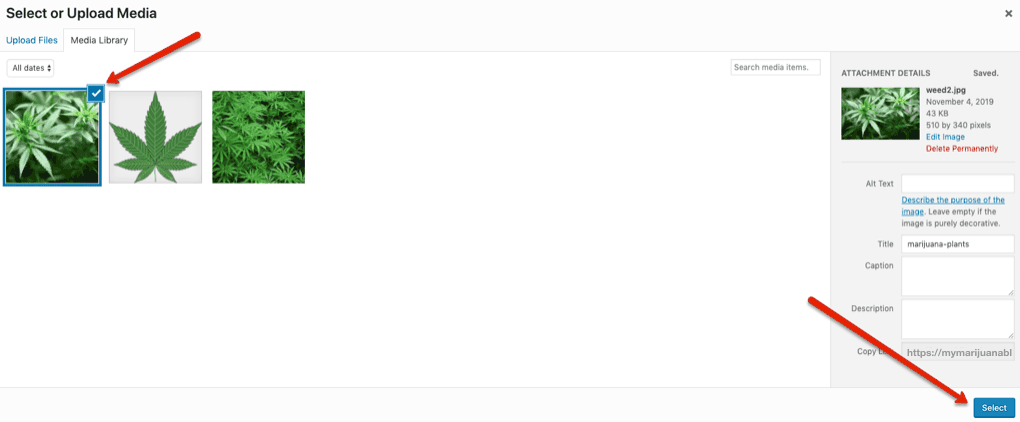
How to select an image in the WordPress editor.
Once you select the image for SEO purposes, add the alt text, title, and caption. Once you click select, it will be automatically inserted within your post. This is what it will look like.
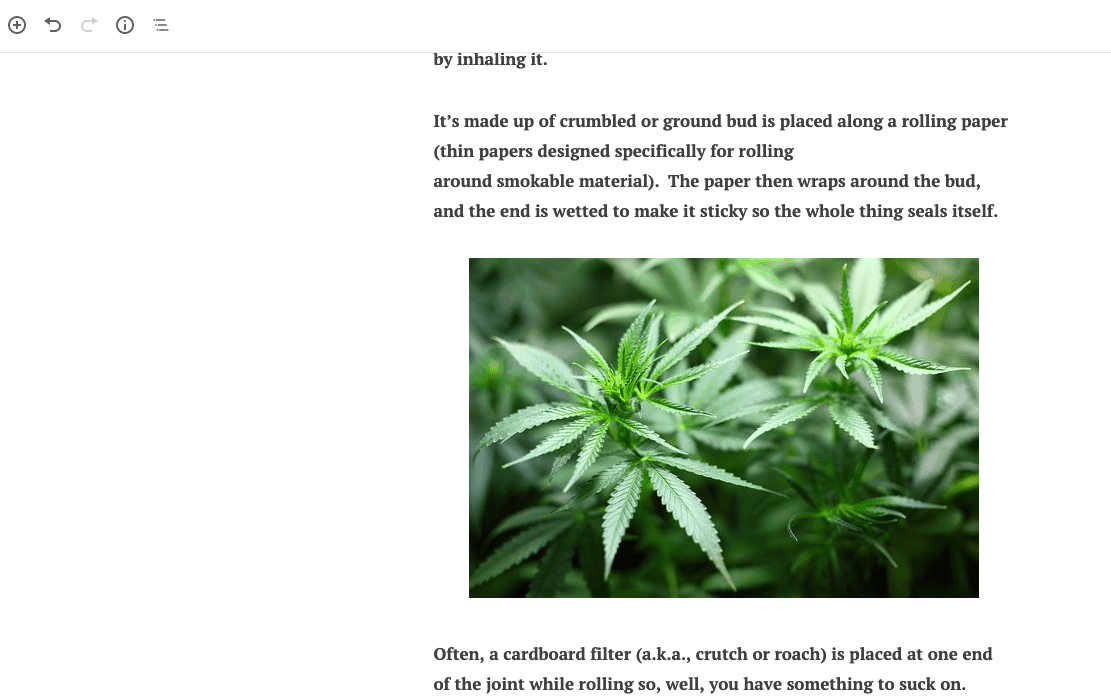
What will your image look like on your cannabis blog?
Once your article is completed, you will want to use the Yoast SEO plugin for a few last-minute optimizations before finishing.
Yoast has a few post-specific settings you should take advantage of. They are under the main text area of the WordPress editor.
There are four main settings we will be discussing. They are “SEO Title,” Meta Description,” “Slug,” and, of course, “Focus Keyword.”
After you complete these four steps, Yoast will preview what your cannabis post will look like when searchers discover it on Google’s search engine results page.
You will want to create SEO titles that attract readers to click on your post in the search results and write meta descriptions that explain your article.
As you optimize your title and description, the Yoast SEO plugin will provide instant, real-time feedback.
Click on the “Edit Snippet” button and then enter your “Focus Keyphrase,” “SEO Title,” and “Meta Description.” There are a certain number of characters that can safely be entered. If the green line turns to orange, some of your information will be cut off in some search results pages.
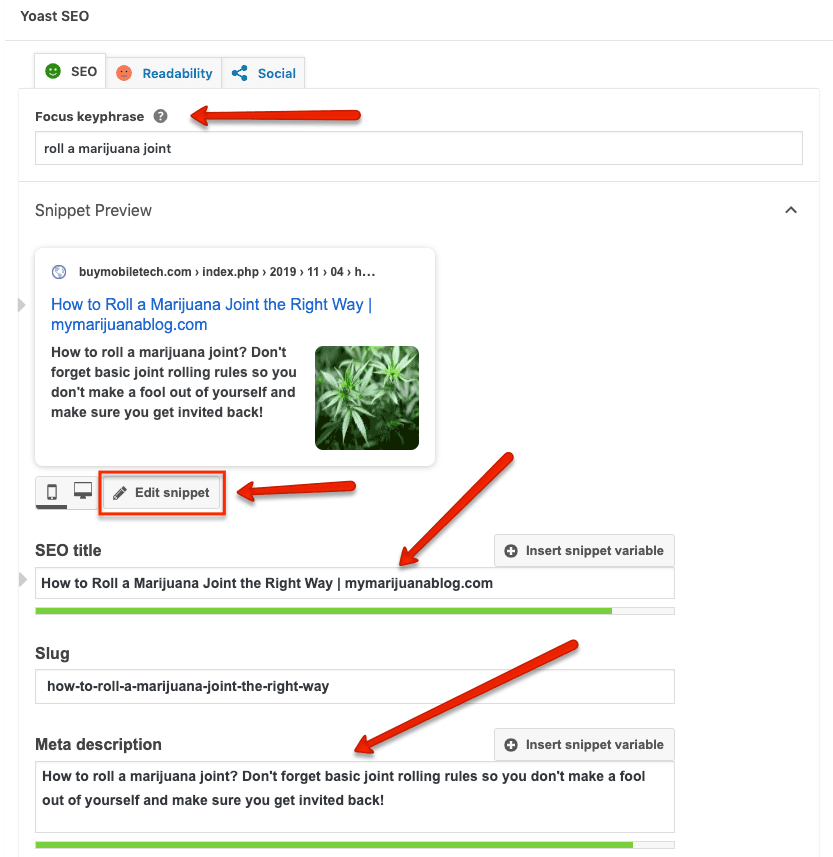
The Yoast SEO snippet.
Once your article is completed, you will want to use the Yoast SEO plugin for a few last-minute optimizations before finishing.
Yoast has a few post-specific settings you should take advantage of. They are under the main text area of the WordPress editor.
There are four main settings we will be discussing. They are “SEO Title,” Meta Description,” “Slug,” and, of course, “Focus Keyword.”
After you complete these four steps, Yoast will preview what your cannabis post will look like when searchers discover it on Google’s search engine results page.
You will want to create SEO titles that attract readers to click on your post in the search results and write meta descriptions that explain your article.
The Yoast SEO plugin will provide instant real-time feedback as you optimize your title and description.
Click on the “Edit Snippet” button and then enter your “Focus Keyphrase,” “SEO Title,” and “Meta Description.” There are a certain number of characters that can safely be entered. If the green line turns to orange, some of your information will be cut off in some search results pages.
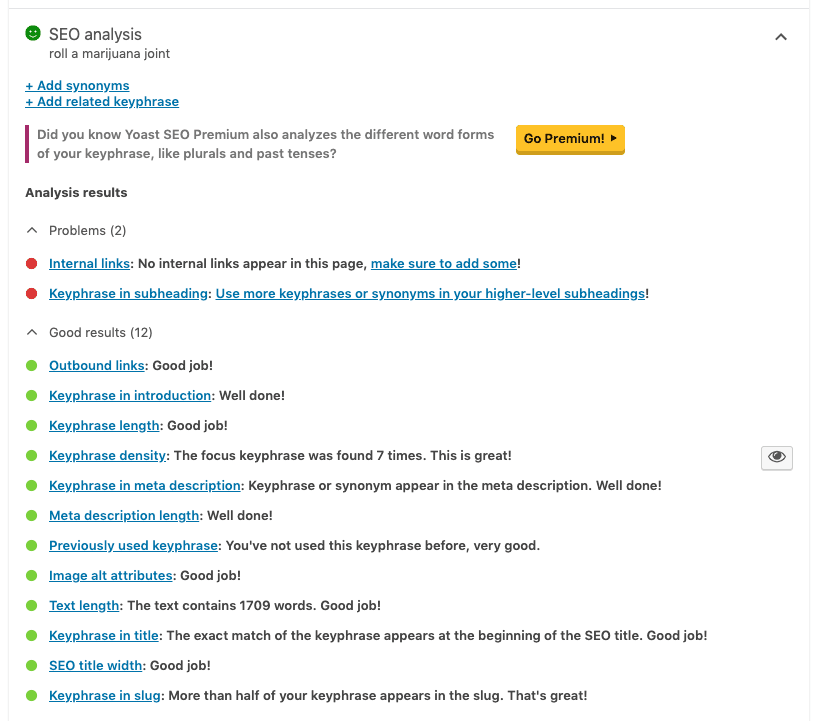
The Yoast SEO analysis of your cannabis blog page.
Lastly, you should set a nice featured image if your blog contains thumbnails. A featured image is a thumbnail that appears above each of your posts.
You set your featured image by clicking the “Featured Image” button on the right sidebar. Once you select it, another box will appear that says “Set Featured Image.” Click it next.
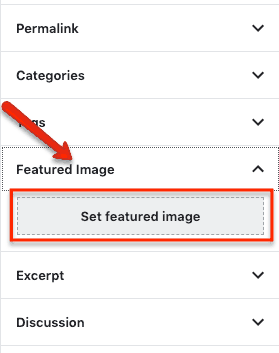
How to set a featured image on your blog.
The media window where you selected an image earlier will come up; now, you must click on the image you want to use.
On the right sidebar, you will need to add a little bit about the image in the “Alternative Text,” “Title,” and “Caption” lines.
Once completed, click the “Select” button in the lower right-hand corner.
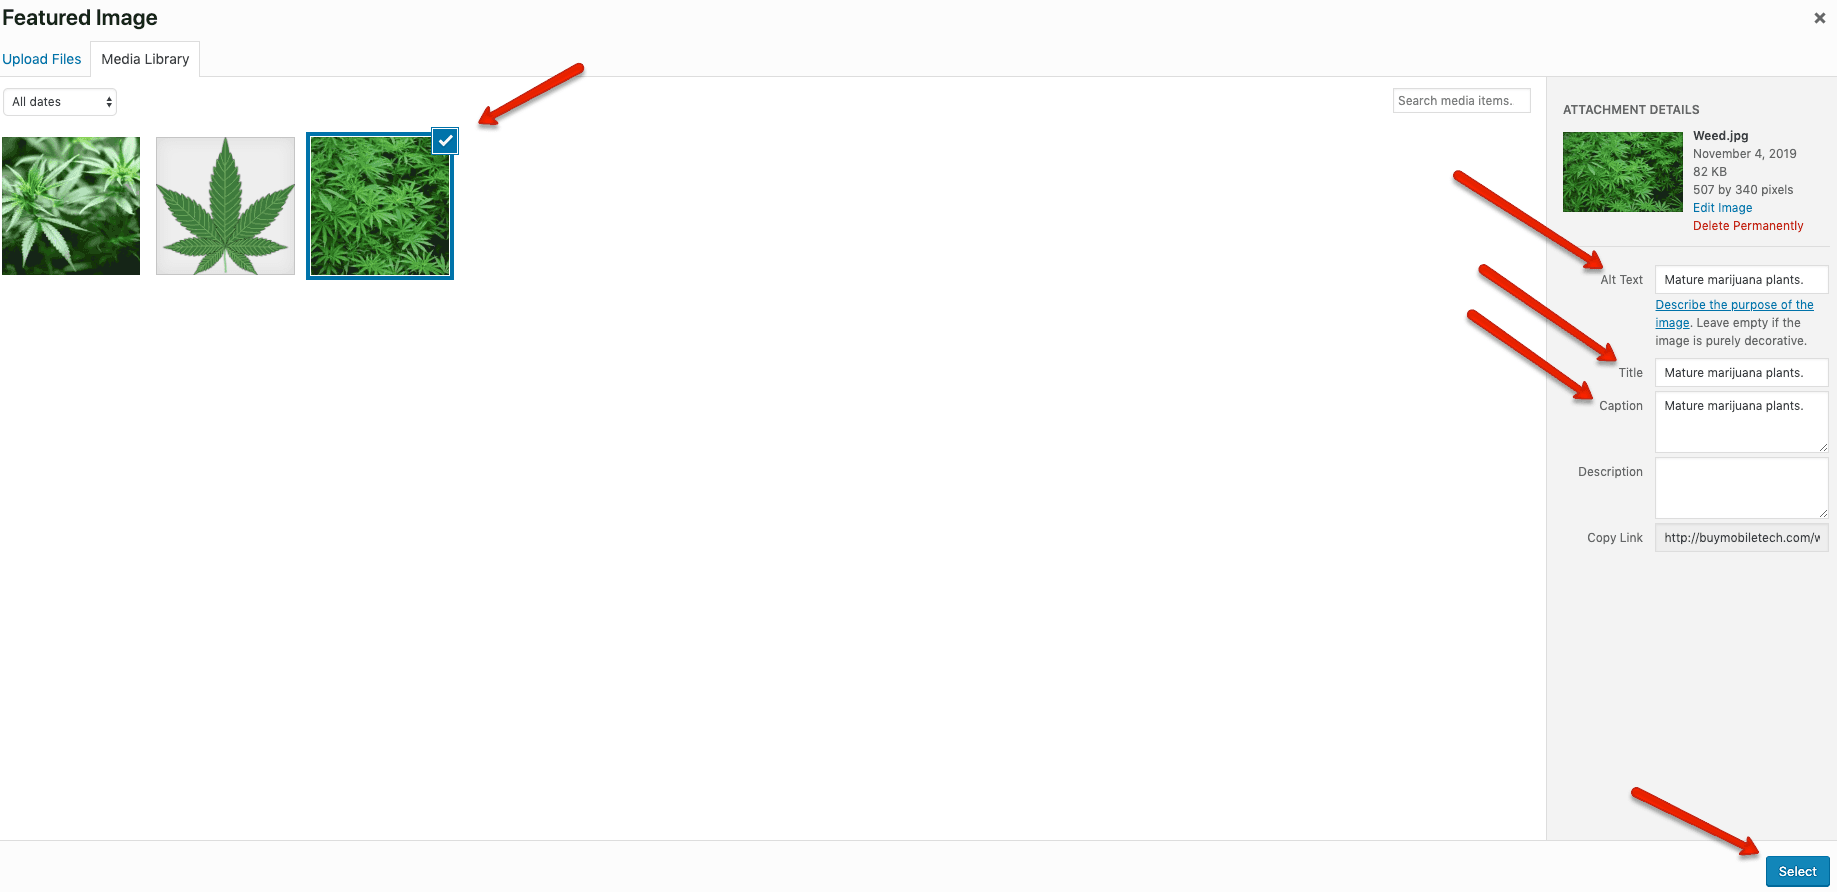
Select and fill out some basic information about the featured image.
Before going live with your blog post, you can take a sneak peek by clicking the “Preview” button in the top right corner of the page.
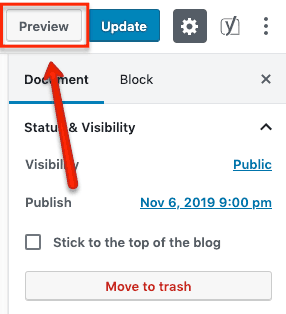
Select and fill out some basic information about the featured image.
Before publishing your first blog post, ensure it looks and feels how you want it to.
Use the checklist below to review your work. Once you’ve completed it, you can hit the “Publish Button.”
- Is your post easy for the eyes by using enough white space?
- Are you speaking to your readers in a conversational tone?
- Did you use headings to separate your sections?
- Does your content flow naturally?
- Did you use bullet points and lists to summarize information?
- Finally, did you check all of your content for typos and grammatical errors?
If everything looks good, you’re ready to publish your first cannabis blog post.
The “Publish/Update” button is in the upper right-hand corner of the WordPress Dashboard. Click it, and your blog post will be available immediately.

How to post your first cannabis blog post.
After all our hard work, let’s look at what our test blog page looks like.

View your first cannabis blog!
Congratulations! Now, take a moment and pat yourself on the back.
You have just successfully created a blog that looks awesome, and it is optimized for search engine traffic. It wasn’t as scary as you thought, right?
Cannabis Blog Conclusion
The harsh reality is creating a blog is pretty straightforward. Building one that will be successful and provide income requires dedication and hard work.
However, we’re here to tell you that the rewards are much greater than the risks as long as you stay focused and follow through.
Blogs of any kind, including cannabis blogs, are more accessible and affordable today than ever. The highest expense is time.
Life will throw you curve balls and bring you many distractions. Once again, our advice is to write about something you are knowledgeable and passionate about and share it through your blog.
We have written it out on this page so you can get started and get well on your way.
Be honest and transparent, and most of all, be YOU!
You will find followers who flock to you as you and your blog grow. Listen to them, engage with them, and most of all, respond to them.
Once you gain traction, learn how to monetize your blog with some of the best cannabis affiliate links.
We got to run; it’s almost 4:20!
More Cannabis Education
How to Smoke Weed in Public Legally
Weed laws have come a long way, and while legalization is becoming more common, public…
Top 10 High-Yield Cannabis Strains for Growers That Will Blow Your Mind
Growing cannabis is as much an art as it is a science. Every grower wants the same thing…
Top 10 Low-Maintenance Cannabis Strains to Grow Indoors
The world of indoor cannabis growing is a place where you can coax leafy green…
How to Set Up a Small Indoor Cannabis Grow Room
There’s something wildly charming—bordering on romantic—about turning a closet or unused…
10 Proven Ways to Cure Cotton Mouth When Smoking Marijuana (And Fix It Fast)
Have you ever taken a puff and suddenly felt like your tongue just walked through the…
You May Also Like
Top 10 High-Yield Cannabis Strains for Growers That Will Blow Your Mind
Growing cannabis is as much an art as it is a science. Every grower wants the same thing…

Top 10 Low-Maintenance Cannabis Strains to Grow Indoors
The world of indoor cannabis growing is a place where you can coax leafy green…
How to Set Up a Small Indoor Cannabis Grow Room
There’s something wildly charming—bordering on romantic—about turning a closet or unused…

10 Proven Ways to Cure Cotton Mouth When Smoking Marijuana (And Fix It Fast)
Have you ever taken a puff and suddenly felt like your tongue just walked through the…

LED vs. HPS Grow Lights: What’s Best for Growing Indoor Cannabis?
So, there I was, face-to-face with my cannabis plants, trying to decode their droopy leaves like a…
Most Recent Posts

Top 10 High-Yield Cannabis Strains for Growers That Will Blow Your Mind
Growing cannabis is as much an art as it is a science. Every grower wants the same thing…

Top 10 Low-Maintenance Cannabis Strains to Grow Indoors
The world of indoor cannabis growing is a place where you can coax leafy green…

How to Set Up a Small Indoor Cannabis Grow Room
There’s something wildly charming—bordering on romantic—about turning a closet or unused…

Top 10 Most Popular Hybrid Cannabis Strains (With Effects & Flavor Notes)
If cannabis were a cast of characters in a Broadway play, Indica would be lounging in a velvet…

10 Proven Ways to Cure Cotton Mouth When Smoking Marijuana (And Fix It Fast)
Have you ever taken a puff and suddenly felt like your tongue just walked through the…


